When it comes to designing a new tile floor in or around Albuquerque, you have more to think about than just which tile material you’d like. You should also consider what arrangement you’d like your tile laid in, and based on that, what size tile you’d need. Sure, you can go with the basic grid pattern. But before you fall back on that old stand-by, take a look at these other popular layout schemes available at the Poulin Design Center.
One option is to keep the good old grid but add some contrast. The checkerboard pattern offers classic styling and the freedom to add some color into your décor. You can go with the classic black and white that is common to early 20th Century kitchens and bathrooms or feel free to choose any two colors that you like to really make a flooring statement.

Another take on the grid idea is the diagonal grid. It’s the same grid layout but it’s turned 45 degrees. Again, this gives you the simplicity a grid pattern installation, but adds another dimension that makes your floor more visually appealing. Choose one tile color, a 2-color contrasting (checkerboard) layout, or even select three or more colors and create a mosaic look.

A slight variation on the grid designs is the brick pattern. We are all familiar with the offset arrangement of bricks, and we’ve all likely seen this layout on walls using subway tiles. What you may not know is that it works great on floors as well. Whether you use a square or rectangular tile, this pattern is a classic that will draw the eye’s attention and liven up your room.
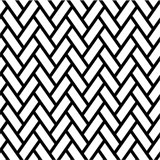
The herringbone arrangement is another well-known design, but one that you might not have considered for your floors. Although it is a bit more complex than the layouts above, it still uses just one rectangular tile size. The herringbone layout is a “busier” look that will really make your floor pop.

We can call this the two-by-two. It is basically a more interesting grid pattern. Rectangular tiles are used in pairs, with each pair sitting adjacent to pairs that are turned 90 degrees. This layout fits particularly well with a southwestern décor that is common in the Albuquerque area. It’s a fairly simple pattern to install that will make a big visual impact.

Here we have a version of what is referred to as the windmill layout – another Albuquerque area favorite. This is the first design mentioned that requires two different tile sizes (and it can be done with tiles of different colors as well). A smaller, square tile in the center is bordered by rectangular tiles to create another variation of the grid pattern. However, like other designs mentioned, this is a grid with way more visual appeal.
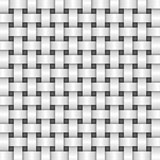
Lastly, if you really want to create a stunning look, consider the basket weave pattern. This look is also achieved with two tiles sizes, but the dimensions are a bit different than the windmill design above. When carefully done, this layout will give the illusion of a woven floor, which is sure to catch the eye and make your room look amazing. As in the image above, using a darker square tile, lighter-colored rectangular tiles, and a darker grout can maximize the apparent three-dimensionality of this design. The converse is also true. A lighter-colored square tile with darker rectangular tiles and a lighter color grout will achieve the same effect.
This is just a sample of the many layouts that are possible when installing a new tile floor. Again, there’s nothing wrong with the classic grid, but a little more creativity in your flooring design can turn an average floor into a spectacular one. Contact the Poulin Design Center any time to arrange a free design consultation, and discuss the many options you have for your new floor!
Photo Credit:
- Checkerboard – Vinko93
- Diagonal – Kamira
- Brick – ExpressVectors
- Herringbone – ScottMurph
- Two-By-Two, Windmill – Rodin Anton
- Basket Weave – naihei


